Showing posts with label entertaining. Show all posts

Tuesday, June 25, 2013

checkerboard table :: diy

About ten years ago I saw a small table in Starbucks with a checkerboard painted on it’s surface.  I took a mental note to do that to a table someday.  A lot of good it did me.

About five years ago I saw a table for sale for a pretty penny in a magazine with a checkerboard painted on it.  I cut it out and saved it in my well organized binder of decorating ideas (did anyone else do that before Pinterest?).  A lot of good that did me, too.

And a few days ago, after watching yet another checker match with my giant checker rug spread out on my coffee table, I finally got around to making it happen…
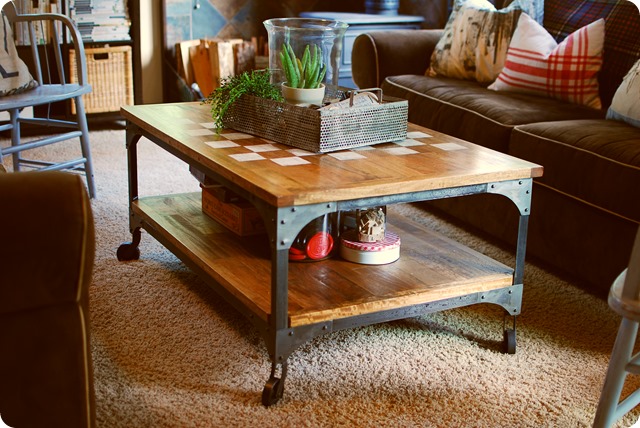
  DSC_0003

I had been on the hunt for the perfect table to paint it on all these years, when I had the perfect table right under my nose!  And had I found a good table to add the checkerboard to, I wouldn’t have had room for it in my little house anyway!  So although adding a checkerboard to a perfectly good, not-so-cheap table, might seem crazy to many of you, it works for me!  I’m unconventional like that.

DSC_0004      DSC_0013

DSC_0008

I didn’t take pictures of the process, but it was really easy… here’s a quick how-to:

Materials:

wood table

painter’s tape

Terrifically Tacky Tape (I used 1/16” width)

Annie Sloan Chalk Paint

paint brush

sandpaper

Annie Sloan clear wax

lint-free cloths for waxing and buffing (available at big-box home improvement stores)

Instructions:

1.  Clean table and let dry.

2.  Measure out your checkerboard to fit your checkers.  I applied painter’s tape around the outer edges.  Then I used the super narrow tacky tape to tape off the inner lines of the grid.

3.  Using a small brush, I brushed on one coat of the chalk paint, carefully staying in my grid.  After every-other square was painted I removed the tapes and allowed this to dry.

4.  I used sand paper to distress the squares, softening them and making them look worn.  TIP:  Be patient.  I sometimes make the mistake of not letting it dry enough and getting distressing that looks like scratches instead of natural wear.  Let it dry completely (hours, at least) before sanding.

5.  Apply an even coat of the clear wax with a lint-free cotton cloth, in a section about one foot square.  Then buff it with a new cloth.  Keep doing this one section at a time until the table top is covered and then give the whole surface a final buffing with another clean cloth to really give it a shine.

It was a pretty quick and simple process.  The ASCP is really quite forgiving.  There is a tutorial by Miss Mustard Seed that tells you everything you need to know about the waxing process.

So now I’m one happy homemaker with the checkerboard table I always wanted, and those checker matches are pretty frequent around here…

DSC_0050 (2)

Tuesday, June 18, 2013

newsflash: great find


I was super surprised and delighted to find these at Target a while back…

DSC_1255

DSC_1256

Only $1.99!  They’re in the party supply section.  I picked up two packs of these colors.  Later on they had a different set of colors (shown in the link).  Last time I checked they had these colors again. 

Anyway, I thought I’d pass along this find to you!

Blessings!

Tuesday, September 25, 2012

cheesecakes in jars


I pinned this a couple weeks ago and have already made them twice…

DSC_0804-2

It’s cheesecake in jars!  I strayed from the recipe by making extra graham crumbs and used more sugar and some powdered sugar.  I thought using real whipped cream would be a good idea, but I a) haven’t gotten around to trying it, and b) wonder if it would hold up as well over a few days if you don’t eat them all right away.  I had lelftovers both times and ate them slowly over a week, but whipped cream might get watery and make the whole thing soggy?

DSC_0800-3 

So here’s my recipe, revised from the one on the Thistlewood Farm blog…


Cherry Cheesecake in a Jar

Ingredients:

3 cups graham cracker crumbs

1 1/2 sticks of butter, melted

8 oz. cream cheese

1 cup of powdered sugar

1/2 cup sugar (less to taste)

1 can cherry pie filling (or any canned fruit pie filling)

1 tub of Cool Whip

8-10 small jars with lids (mine I saved from Bonne Maman jelly)

Instructions:

Mix crumbs and butter. I like mine nice and moist, but feel free to leave out some butter if you prefer.  Press a generous spoonful or two into the bottom of each jar.  Save some crumbs for topping.

Use a mixer to beat cream cheese, sugar and powdered sugar until smooth.  I added powdered sugar to this recipe because I don’t like my cheesecake to taste like straight cream cheese.  If you don’t mind the strong cream cheese flavor, you can leave out some sugar.  Taste as you go!  Add a layer of cream cheese mixture to each jar.

Add a layer of canned cherry pie filling to each jar.  I used blueberry pie filling the second time around, which was well liked, though I prefer the cherry.  I would say the most important part of this otherwise easy recipe is choosing a yummy pie filling that you really enjoy.  If you have a friend who makes homemade canned cherry pie filling like a boss, but she moved away and left you destitute, you are on your own and at the mercy of the grocery store, just like poor me. 

Now, add a layer of cool whip, and top with some crumbs, a cherry and a lid and you’re ready for a great grab-and-go party dessert!

DSC_0805-4

Now I’m stuck in an ethical debate – to eat the last one left in the fridge, or let all the kids share it… I guess I have to be selfless, since I told them they could have it already.  I better post this and stop staring at it, or else my self control may fail me! 

Godbless!

Tuesday, June 19, 2012

ladies’ tea

Each year, our church hosts a Ladies’ Tea.  It is a fun event where ladies decorate tea tables, and we invite women to come and share a meal and some inspiration and fellowship with us.  There are always many friends of friends and friends’ family members to meet, as it brings in lots of new faces from all around. 

This year was the third time I have decorated a table.

DSC_0581

My friend Sarah and I teamed up and did a “vintage country” themed table.  That picture is kind of misleading.  It makes it look like I put a lot of time and effort into this event.  In the interest of full disclosure, my life became especially crazy just before the tea, and I scraped it together at the last minute.  All I did is write guests’ names on tags, bring a bunch of dishes and linens and make a little bunting.

Anyway, without further ado…  here’s our table!  We used Sarah’s vintage Corelle dishes for each place setting…

DSC_0582

DSC_0586

We used mason jars for drinking glasses, with paper straws, and it was basically my favorite part of the table!  And I would like to report; I was concerned that the straws would get wet / soggy / slimy / weird… they did not!  The straws were totally fine for the whole tea!

Here are some shots of our centerpiece…

DSC_0587

DSC_0609

DSC_0583      DSC_0584

I had asked my hubby for the wood slabs months ago, and forgot to remind him as it got close to the tea.  I reminded him the night before while we were setting up, thinking there was no way… and he was able to make them and showed up with them just as Sarah and I were finishing up.  They worked out well!  Thanks honey!

DSC_0593

DSC_0600     DSC_0603

Sarah made the bookmarks as favors, and brought the paper flowers and the sweet floral sifter.

DSC_0607     DSC_0628

DSC_0625     DSC_0613

The table cloth was from farm chicks.  The wire tiered server and the ceramic baskets were from Target the night before (hehe).  The footed milk glass bowls, jars, water pitcher with red design and most other random pieces were thrifted.  Sarah decorated the sugar cubes with her frosting creations – lovely!

Once everyone arrives, we get to eat and visit for a while.

After devouring fruit, scones with cream, lemon and jam, drinking lemon ginger tea, cream puffs, tarts, cucumber, chicken salad and divine ham sandwiches and other fancy treats, it is time for some talent and inspiration…

This little dear was not even nervous for her big singing gig…

DSC_0608

DSC_0636

It was precious!

There was also a gal who sang funny songs for us, one about growing older called “the gown that opens down the back” which had us all laughing.  There was also a women’s quartet and a lovely speaker, who also sang for us.  I took pictures of all this, but forgot to ask if I could post them, so I’m leaving them off.

Here are some detail shots from other tables around the room…

DSC_0610

DSC_0611

DSC_0617     DSC_0618

DSC_0619

DSC_0641

DSC_0620

DSC_0642

That little cake was so delicious!  Someone didn’t show up at that table and I kissed up enough that the lovely hostess was so sweet and gave me one.  I believe I can safely say that a lovely time was had by all!  What a special savior we have who delights in us as much as we delight in gathering in a special time of fellowship surrounded by pretty things.  I wonder, will there be tea tables in heaven?  …

Monday, April 16, 2012

chai tea at home

Hello, friends!  Hope you are having a happy Monday!

My dear pal Leah blogged that she had been loving this Chai Tea recipe a while back, and I finally got around to making it.

DSC_0477

I got the cool soda bottle thing from Ikea ($3.99).  When I got that, I simply HAD to make the Chai.

DSC_0480

It is sooo good!  I love the spicy flavors of Chai.  If you have never had Chai, to me it is similar to the spiciness of pumpkin pie… that sounds weird, but if you like those spices, this is similar: cinnamon, cloves, nutmeg, and ginger along with a couple exotics: star of anise and cardamom.

The recipe makes one batch of concentrate which fills this bottle.  You keep the concentrate in the fridge.  One batch makes me about 5 drinks.  I like to mix one part concentrate with one part vanilla soy milk, add some ice, and a splash of half and half to richen the deal.  Oh yeah.  You could also heat or steam your milk and make your chai hot.

Go forth and be sweetly and spicily caffeinated!  =)

Wednesday, February 16, 2011

swap meet party


I saw a magazine article a while back that caught my attention, so I snipped it out and saved it…

swap1swap2

The whole idea is that you get your girls to bring their best ‘donation’ items and you all swap stuff.  It is a win-win: you were going to donate the items anyway, and now you and your friends saved money by getting some free stuff in return for your donation items.

I copied the article and made invitations out of tags.  When I sent them out I included a photocopy of the article so guests could get an idea of how it would all go down.

DSC_1759

DSC_1761

The tags were $5 for 100 which I thought was a good deal.  I just printed out the text on regular old paper, cut it out, and stuck it down with a couple squares of double stick tape.  Oh, and I sent the invites out a couple months in advance so people could hold off on donating their best items and have something to bring to the party!

Here is a picture of my contributions set up before guests arrived…

DSC_0313

I placed the brown paper (like in the article) where the items would be displayed around the house so everyone knew where to stick their stuff and what stuff was up for grabs.

So, here is a description of the whole swapping process.  You bring, say, 5 items.  You write a description on a tag for each one and attach the tags to the items. 

DSC_0320

Then you take five clothespins (one for each item you brought) and write your name on them.  Now you shop!  You go around putting your clothespins on the tags of the items you want to take home.

DSC_0322

When everyone is done shopping, if yours is the only clothespin on an item’s tag, that item is yours!

But when, as above, multiple people want an item, all the pins are put in a bowl, stirred up, and one is drawn – that winner gets the item.  The person who didn’t win gets their pin back, so they can go put it on something else. 

As the guests arrived, I kept making announcements about how to tag your items and how to shop, so I did a really bad job at taking pictures!  There were some great items, too!  Better than I had hoped!  Here is a tiny, random sampling…


DSC_0323

A cool little bench I snagged from a friend’s mom.  I didn’t know where I was going to put it but I loved it.  It ended up fitting in Mark’s room perfectly and I piled books under it.


DSC_0324

I snagged this chair from the same friend’s mom at a garage sale last summer!  I never got around to recovering it and in the mean time, my plans changed and I didn’t need a chair like this any longer.  Never fear, Leah is the new proud owner and I’m sure she’ll tell us all about it when she freshens it up.  =)


DSC_0329

And I snagged this flameless candle from… I don’t know who – I lost track! 

So, I know, bad Tasha for not taking pictures during the party, but it was a success, if I do say so myself!  Everyone seemed happy with the process and happy with their items!  I have also been to a clothing swap party, and even though only 4 of us showed up, we still each came out with something and had fun.  I would highly encourage you to try something like this! 

Tuesday, January 11, 2011

Late Again–Mark’s Birthday Post

I am coming to the conclusion that I will never be timely ever again in my life. I don’t know if I should try with all my might to counteract it or if it is a losing battle and I should come to terms with it.

Anyway, over a month ago, we had a little birthday party for Mark. I thought it turned out pretty neat, so I wanted to share a few of my favorite parts…

First, I whipped up some invitations with the help of Photoshop, my printer, some construction paper and string, and little hands…

DSC_1018 DSC_1019

DSC_1016

Using Photoshop, I snipped Mark out of our family picture and created the text for the front and back of the invitation, then printed and cut and glued and made some little tiny flags (I love flags) and added a string of them across the top. Then he wrote his friends’ names on their invitation on the line I provided.

That string of flags was inspired by my SIL Carrie making a cool happy birthday banner. She cut the letters out of sheets of construction paper and glued each one onto a whole sheet, and strung them all up on a string – totally cute! Mine had to be flags, though!

DSC_1027 DSC_1040

DSC_1080

Mom brought me the letters fresh off her Cricut cutter, so I didn’t have to cut each one out. I strung it from beam to beam in our great room (it is not very great, as in large, but it is our kitchen, dining and living room all in one).

I planned this as a kids-centered party, and didn’t want to be feeling awkward in my tiny house with adults standing all around with nothing to do but watch me try to entertain the kiddos. I told the adults to drop off the kids and I had activities planned and ready to go…

DSC_1081

Those are goody bags that had a spot to color in Lightning McQueen and Mater, and my dining table covered in newspaper to protect it from stray crayon and maker scribbles.

DSC_1083

The goody bags were prefilled with trophies from the dollar store (4/$1) and candy, stickers and noisemakers.

It was a very racy party, everyone had Pit Crew badges…

DSC_1082

And the games were all centered around racing. I didn’t take pics but we had the hot wheels race where each kid chose a Cars movie hot wheels type car from Mark’s extensive collection and lined up at one end of the hallway and shoved their car off, trying to get it to land in (or close to) a designated tile “box” outlined in painter’s tape, at the other end of the hall.

Then we had the bean bag toss where they stood behind a line and tried to land their beanbags inside a dirt bike tire on the floor across the room. We had four of the neighbor’s 17 (that is not a typo) children show up and the older two were super helpful in helping the little ones with the games – it was such a blessing!

After coloring and games it was time for presents…

DSC_1100

He was so psyched to open every present!

Then time for cake…

DSC_1107

Mark got his own personal piece of cake to blow out the candles on. Have you ever seen a toddler “blow” out their candles? It is not just air that comes out, people! And he was sick, so I didn’t want to spread the germs!

After cake we had an extra half-hour so we bundled up and went outside to be wild. The whole party went really well! I had plenty of help – my teacher friend Kristel stayed to help me wrangle the kids and also ended up taking some pictures, which was good because I was a little busy! Grandma Debbie was also there to help with the littlest ones. Grandma Sue who lives out of town, paid for the cake – Spiderman was very cool and was tasty! And Ty was the game judge and also supervised the wild time out in the pasture. It would have been severely chaotic without all the help, thanks guys!