Pages

Sunday, October 31, 2010

Happy Halloween!


Yesterday was kind of our Halloween. It started off with a trip to The Farm at Swan Trail. Love, love, LOVE that place. The first time I went I was sick and totally sleep deprived (Susie was sick too) and grou-CHY. So I vowed we would go back with a better attitude and the camera. Of course that was the gloriously sunny day and the following two visits would be rainy. But, we did get to grace the corn pit with our presence again and it was bright enough in there with the clear roof to get some pics...


Mark could LIVE in the corn pit. It is all he talks about after we visit. He gets to make corn angels (above) and try out his 'moves'...


This one cracks me up...


It reminds me of a 'my space' pic (when you are holding your own camera and taking a picture of yourself), and he is all, 'check me out, I'm rockin' the corn pit, I'm totally making this my profile pic'...

We climbed the giant pumpkins...


And did a bunch of other things in the rain where I didn't dare take out my camera and get it messed up before I shoot a wedding next weekend. Then Susie was frozen and we had to go home.

Mark decided he wanted to be Batman for Halloween (a recent obsession), so I went ahead and planned on that. Then we had to all wear costumes for a party, and I decided to copy a magazine clipping I had saved, and Susie would be a bee and I would be her flower. This is how we turned out...


Mark had been super scared of masks until the morning of our activities, when he said "Halloween is on!" and donned his mask for the first time! Silly guy!

Ty and I aren't especially fond of wearing costumes, but he had the best idea this year. He was going to be a Chilean miner! He even has the costume already because he has a helmet and gear for his tree climbing work. Unfortunately, he got home too late after a dirt bike riding trip and showed up for the end of the party, uncostumed.


As I write this, Mark and Ty just got home with the goods. Ty took him trick-or-treating around the neighborhood (in the sticks) with no luck, so they went to a neighborhood a bunch of older couples from our church live in and Mark raked in some good sweets. Something tells me he may not be done with his costume just yet, though.


Thursday, October 28, 2010

Kristel's Funky Living Room Plan!


I have a friend named Kristel. She cracks me up when she sporadically decides to blog. =) Kristel needed help developing a plan for the direction she wanted to take her living room, which was fun, colorful and funky, and I needed to do some practice room plans, so we struck a deal. Here is what I whipped up for her...


I think that fits the fun, colorful and funky guidelines! I know Kristel, and she gets tired of normal very quickly! This eclectic mix of fresh, fun items will keep her living room bright for some time. Here are the details of her plan:
1. Rug, Coffee Table & Side Table
First of all, she recently got her wood-paneled accent wall painted the color we picked for her (seen in the background), which brightens up the room so much! Check that off the list! The rug ($159) will soften the seating area and anchor it amongst the hardwoods in the big living room. Then we have the coffee table ($149) and a side table ($79.99) with a coat of orange spray paint ($5) giving her a place to prop up her feet or set down her espresso.

2. Couch & Pillows
This is the investment piece. Kristel said she wanted to save and get a new couch, so I advised her to keep the sofa neutral but keep the room punchy with accessories that are much more affordable to change out. I chose a neutral, clean-lined sofa ($1,199). Then peacock ($19.99), bloom ($6), and spruce velvet ($19.95) pillows bring some softness and color to the sofa.

3. Sofa Table, Lamps & Floor Lamp
Next we need some light in this room to compensate for lack of ceiling fixtures! The sofa table ($199) is a great place to set books, knitting, or items to keep out of reach of baby, and to anchor the floor lamp ($39.99), which would set next to it and reach over the couch to provide task lighting. Then the table lamps ($59.99 x2) would be on her two existing, matching TV units on either side of her fireplace. We already picked the TV units, got them used and they will be painted white to create the feel of sturdy, crisp built-ins.

4. Side Chair(s)
Next we would add a side chair, or preferably a pair of them. The pictured side chair is high-end, but I think Kristel and I would be able to find a garage sale or thrift store special and reupholster the cushions for substantially less (estimated $100 for chairs and fabric).

5. Tray & Bowl
Not only are the Fiestaware serving tray ($21.99) and carved wood bowl ($29.99) colorful and interesting accents, but they will help corral remotes, loose change, candy or whatever needs to be captured on the coffee table or sofa table.
So there you have it, Kristel! I hope this helps you have a vision and goal for your room, and you know you get the special 'friend deal' and I will be here to help along the way as you need me!

Wednesday, October 27, 2010

Dyed Tea Towel


We had a ladies' fun and frugal night at church where we all brought items from our homes that we no longer wanted, and traded stuff (I highly recommend it!). There was also visiting and some food involved and even a couple craft activities. Part of the craft was drawing designs on a plain tea towel, to take them home and embroider or applique later. Um, my patience for that flew out the window when I had kids, so I sat and visited. When I got it home, I remembered that I have one of those 300 Decorating Ideas Under $100 books at home with an idea in it I had been wanting to try for years...

DYED DESIGN

MATERIALS
Plain drapery panels (or other material you want to dye)
Mustard
Red paste food coloring (optional)
White vinegar
Microwave-safe bag

Step 1. Silk and wool fabrics work best for this project. Wash and dry the panels. Iron the fabric and tape it tautly to a paper-covered work surface.

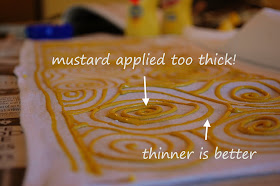
Step 2. Shake the mustard and apply it in spirals directly to the fabric. (For better contrast, darken the mustard by adding a smidgen of red paste food coloring to the container.) Let the mustard set for about 30 minutes until it's nearly dry. Rinse the fabric with a high-powered spray of warm water until the mustard is dislodged and the water runs clear.

Step 3. To set the color, immerse the fabric in 10 quarts of warm water and 1 cup of vinegar, agitating it to remove the excess mustard. Seal the wet fabric inside a microwave-safe plastic bag and turn on at 50% power for five minutes. Watch the fabric carefully so it doesn't scorch. Caution: towel and bag will be HOT.

Step 4. Line-dry the fabric; press with an iron to further set the design. (Clothes dryers do not get hot enough to set a dye.)
A couple hints from me:

1) I put the mustard in a melting/decorating squeeze bottle which I found easier to get a nice bead out of. It works better if you keep the tip pressed onto the fabric and don't get a big fat bead of mustard. Fat beads won't dry, and when they rinse off they will drip down the fabric and get stains all over where you don't want them.


2) I did not use the food coloring and it is a little muted but I like it.

3) I was only doing a tea towel, not curtains, so I used 1/5 the recipe for the vinegar water. And, I don't know if there is such a thing as 'microwave safe bags'...? My normal one worked fine.


I really like the idea and might try this recipe for making dye out of plants and fruit, in different colors. It would be really sweet for organic baby or children's' clothing, but I'm not yet sure how it holds up in the wash. Fun stuff.

Random Inspirations


Some things that inspire me - from the archives on my computer...


Sorry, no sources - I will have to start keeping that info.

Tuesday, October 26, 2010

Beef... he's what's for dinner...


...next summer that is, after we fatten him up! Meet our newest farm animal / dinner entrée...


Mark tried to name him Travis Pastrana 199 (big surprise there), but Ty overruled and named him Beef. Mark calls him "Beef Travis Pastrana 199" half the time. Don't let that sweet look above fool you, although he is halter broke, he does have his mad cow moments...


Did you know the universal cow sign for "you are making me nervous and a little frustrated" is throwing up their head and rolling their eyes, with the optional flinging of snot? It is.

Anyway, husb did a side job and the guy offered Beef as a trade. He is a beef / dairy cross and we are told he won't get as 'beefy' (haha) as a beef cow, but he will still be good eating. I have looked into it online and read only good things about them - some people say they prefer Holstein and will never go back to Angus or other beef breeds. They also say it is a good idea to get in with a dairy farmer and you can get cows from them that are past their milk prime, but mature and ready for butchering. Then you don't have to raise your own. Since we have been seeking out at least grass fed, if not organic beef since watching Food Inc., and we have pasture, he jumped at the deal. I'm interested to see the cost of growing our own vs. buying; I'll let you know how that goes.


I know I've not been posting frequently, but I have exciting plans... but not so much money, so things are moving slowly at my place. I do have a couple room plans to finish up and will share them here soon (I know- you've heard that before)! And a couple projects to do on the super-cheap, so stay tuned, bear with me, cut me some slack, calm down and get off my back... just kidding. Seriously, Susie and I have been super sick for the past week and I am just now getting the dry cough that means it is almost over. Thanks for your patience!

Monday, October 18, 2010

The Power of the Spray Can


Lately, I want to spray paint everything I see! First of all, I am over trying to paint furniture with no brush strokes! It doesn't matter whether I use a cheap brush, expensive brush, the chemical stuff you mix with paint to reduce brush marks, foam brushes - it still makes me crazy. I spray painted a stool (see my brand recommendation) and a telephone table and I am sold. But lately it's not just furniture. Enter, before and after...


That corner was so clear and blah before! I bought a new canister every couple weeks or whenever I could scratch it out of the budget. A little hit of spray paint to their lids and ... wah-la! I used the leftover spray paint from painting my stool. The lids were stainless steel, so I had to buy spray primer (same brand as spray paint), and give them a coat of that first. Then the paint stuck perfectly!

Some day when I'm feeling spunky and have some money (ha! never?) I might get more paint and make each lid a different color. But I am just happy to have color in that corner for now.

Moral of the story: spray paint = happy in a can. Other possibilities: pottery (for decoration only), vents, lamps, curtain rods, cabinet hardware, furniture... and many more!

Saturday, October 16, 2010

Nielsen Engagement Photos!

Two friends recently gave me the honor of capturing their engagement photos, and I got several favorite shots out of the half hour session! Here they are...


Thanks so much Erik and Amber, you were easy to work with and I have many more shots to edit, too. Congratulations on the engagement! I am looking forward to capturing your wedding, coming up!

My Lame Fall Decorations and Homeschool Started


I struggle with fall. First of all, husb gets all pouty when the summer comes to an end, and understandably so, since he works outside in the Pacific Northwest. So I tend to feel bad for him and hold off on rubbing it in that it is fall until it is completely undeniable. By that time, the color outside tends to satisfy me enough I think. Plus, my living room is done in brown earthtones with lots of orange, so it is basically fall year round in my living room! Anyway, after everyone around me decorates for fall I end up feeling left out and busting out my puny stash of fall decor...


That is it. Now Christmas? Christmas I have about three of these boxes full plus a couple more random things in their own packaging. But fall is pretty dinky around here. All I really have to show you that I accomplished is that I added some pumpkins and a gold mercury-glass votive to my display by the TV...


I know, really minimal. By the way, please notice that I did find a home for Mr. Squirrel (from Farm Chicks).


I finally convinced myself that he had no soul so it would be okay if I suffocated him in the cloche to save him from little fingers and dust on his belgain burlap. I gave an armful of tiny leaves...


He is happy. The only other things I did is put the rest of the pumpkins on a shelf in my entry way, but it is too pitiful to show you (maybe I will dress it up a little and share it later), and all the little votives are lined up in my windows to try to draw a couple trick-or-treaters in, but I'm not holding my breath. One of the hardships of living in the sticks.

In other news, I started Mark in homeschool! We are still working on getting all our books together and start following the curriculum (which I will share later if I love it), but every day while Susie takes her first nap, we work on homeschool for a good hour or more. I think I will have much to share on the topic if there is any interest. This "decor blog" is already scatterbrained enough, why not bring in one more topic!? We'll see. Anyway, this was one of our first cool projects...


I saw the idea displayed on a bulletin board at my teacher-friend's school. You write their name nice and big (a longer name might need a bigger paper) and then let them man the glue stick and cover their name in torn pieces of paper. Mark helped me cut some of the paper while I tore some. He is learning to use his kid scissors, finally. He liked it and it helps work on fine motor skills and get them more familiar with the letters as they work on it.

Okay I have been debating sharing this but it is too funny and I must share. Mark drew a guy and his arms and legs were floating in the air - he had no body. My teacher-friend tells me kids usually start out drawing people that way. So I told him, "good job, but he has no body, can you draw him one?" and he added something in the middle of the arms and legs which I will let you see for yourself...


I said, after choaking on a laugh, "oh, what are those?" and he said "those are his buns." Ohhhhhh.

Thursday, October 7, 2010

Garage Sale finds and Pacifier Solution


A dear friend reminded me that last weekend was the Mill Creek Community Garage sales! I always neglect to keep tabs on those big 'rich neighborhood' sales, but they can be so good. So we stuffed the girls (my baby and hers) into the backseat and headed for the sales! I spent $20 and came out with this:


Got some fun stuff including hardbound books (always a decorating necessity for me), kids books and a counting game, new train sets for only $1 each, picture frame for my bedroom collage and a great little red lantern. The sales were decent but I bet the one earlier in the year is better and more people do it when it is warmer. Truth be told, if I had more money there were a couple pieces of furniture I would have come home with! The community is only allowed to have sales on two weekends a year. I will surely do it again next time!

And, I showed you my weird sleeper solution... well now I have an awesome pacifier solution! Susie likes to spit out her plug like a projectile, or better yet, throws it and gets mad (yes we are at that stage), and I hate the ugly paci clips they sell in the stores, so I thought I could make my own...


I cut a piece of ribbon and melted the ends with a flame. Then I tied it to her paci and to her outfit. It even works when they have a button up on; just loop it through the holes (around a button) and tie. It's so great, and I especially love it in public, so she doesn't drop her paci out of the cart or carrier and onto nasty floors! Happy mom!

Stay tuned, I am working up a couple of room plans and will share them with y'all as soon as I can get them ready. I wish I was from the south so I could say 'y'all' without feeling like a poser.