Monday, July 22, 2013

a photoshoot and a giveaway

Hey y’all. 

I have been absent… again.  I am the worst blogger sometimes.  I have a new job opportunity that I am working on quite a bit lately.  Been spending some late nights with Photoshop, some of my images, and PowerPoint.  Getting ready to do some teaching.  =)  Super excited.  I will share details later, when I have them.

Here are some images I captured for examples for teaching and for promoting the class…

I apologize in advance for photo overload.  I got a little excited.  =)

DSC_0260

DSC_0270      DSC_0272

DSC_0276

DSC_0278

DSC_0281

DSC_0286

DSC_0296

DSC_0303

DSC_0315

DSC_0331

DSC_0343

DSC_0358

DSC_0359      DSC_0397

DSC_0372

DSC_0390 (2)

DSC_0407

DSC_0444      DSC_0441

DSC_0426


It might finally be time to order up something on a canvas.  But it will take me a year to pick which ones!


Okay, I have to get back to work, but first I have to tell you about a giveaway on the brand new blog of a dear friend of mine!  Head on over to A Town Girl’s Life and enter yourself!  That link is to the giveaway but be sure and check out her other posts.  And enter the giveaway.  I’ve already entered three times.  So good luck with that.  =)

I’ll check in again soon.  Blessings!

Thursday, July 4, 2013

happy fourth


It’s been a slow week around our place.  Slow but good. 

Switching things up around the house.  Visiting grandma’s lake on these hot days.  Harvesting from the garden.  Having a couple days off.  Breathing.

Today we have a fourth of July party to attend tonight and I actually made my dessert this morning with exactly the 8 hours of required chill time… that might be like the first time I’ve ever accomplished that.

Now, we relax. 

The neighbor boys came over to set off smoke bombs with Mark and I caught this little chain of events with the telephoto…

DSC_0111

DSC_0113

DSC_0114

Are smoke bombs and stink bombs the same thing?  If not, apparently smoke bombs also stink.

I have some blogging to catch up on in the next couple weeks; I have several posts in the works… I’ll try to get to it in between the iced tea and sun bathing. 

Blessings!

Friday, June 28, 2013

farmhouse friday { 7 }

Just in the nick of time, a great renovated farmhouse.   Always been a favorite.

Tuesday, June 25, 2013

checkerboard table :: diy

About ten years ago I saw a small table in Starbucks with a checkerboard painted on it’s surface.  I took a mental note to do that to a table someday.  A lot of good it did me.

About five years ago I saw a table for sale for a pretty penny in a magazine with a checkerboard painted on it.  I cut it out and saved it in my well organized binder of decorating ideas (did anyone else do that before Pinterest?).  A lot of good that did me, too.

And a few days ago, after watching yet another checker match with my giant checker rug spread out on my coffee table, I finally got around to making it happen…
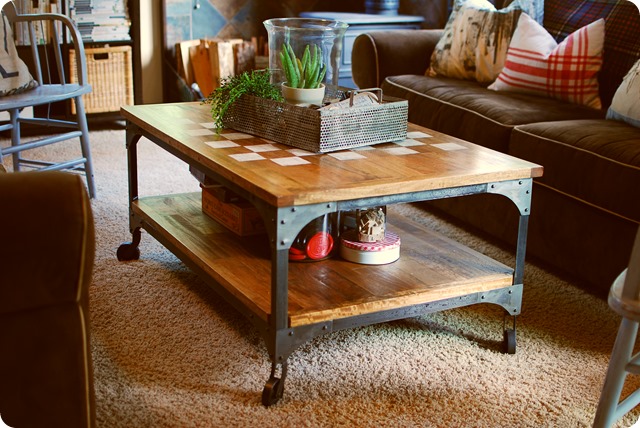
  DSC_0003

I had been on the hunt for the perfect table to paint it on all these years, when I had the perfect table right under my nose!  And had I found a good table to add the checkerboard to, I wouldn’t have had room for it in my little house anyway!  So although adding a checkerboard to a perfectly good, not-so-cheap table, might seem crazy to many of you, it works for me!  I’m unconventional like that.

DSC_0004      DSC_0013

DSC_0008

I didn’t take pictures of the process, but it was really easy… here’s a quick how-to:

Materials:

wood table

painter’s tape

Terrifically Tacky Tape (I used 1/16” width)

Annie Sloan Chalk Paint

paint brush

sandpaper

Annie Sloan clear wax

lint-free cloths for waxing and buffing (available at big-box home improvement stores)

Instructions:

1.  Clean table and let dry.

2.  Measure out your checkerboard to fit your checkers.  I applied painter’s tape around the outer edges.  Then I used the super narrow tacky tape to tape off the inner lines of the grid.

3.  Using a small brush, I brushed on one coat of the chalk paint, carefully staying in my grid.  After every-other square was painted I removed the tapes and allowed this to dry.

4.  I used sand paper to distress the squares, softening them and making them look worn.  TIP:  Be patient.  I sometimes make the mistake of not letting it dry enough and getting distressing that looks like scratches instead of natural wear.  Let it dry completely (hours, at least) before sanding.

5.  Apply an even coat of the clear wax with a lint-free cotton cloth, in a section about one foot square.  Then buff it with a new cloth.  Keep doing this one section at a time until the table top is covered and then give the whole surface a final buffing with another clean cloth to really give it a shine.

It was a pretty quick and simple process.  The ASCP is really quite forgiving.  There is a tutorial by Miss Mustard Seed that tells you everything you need to know about the waxing process.

So now I’m one happy homemaker with the checkerboard table I always wanted, and those checker matches are pretty frequent around here…

DSC_0050 (2)

Tuesday, June 18, 2013

newsflash: great find


I was super surprised and delighted to find these at Target a while back…

DSC_1255

DSC_1256

Only $1.99!  They’re in the party supply section.  I picked up two packs of these colors.  Later on they had a different set of colors (shown in the link).  Last time I checked they had these colors again. 

Anyway, I thought I’d pass along this find to you!

Blessings!